
Pluck Perfect Eyebrows. Face the challenge ...
STEP BY STEP TUTORIAL: EYEBROW PLUCKING
1 – WHAT YOU NEED
Before you start, gather everything you need so you can work without interruptions:
- a mirror
- good lighting
- an eyebrow pencil
- a White Stick (for mapping and priming)
- a good pair of tweezers
- an angled brow brush with spooly end
- cosmetic scissors
Having the right tools on hand makes all the difference. Check out our full Eyebrow Makeup collection to shop everything you need in one place.
2 – PREPARE YOUR SKIN
It's best to pluck your eyebrows after the shower. The warm water and steam softens your skin and opens your pores, making the process a lot easier and less painful.
If you prefer to pluck at another time, clean your face with warm water or place a hot towel over your eyebrows for two minutes.
Once your skin is prepared, you're ready for the next step.
3 – DETERMINE YOUR SHAPE
There are various ways to find your perfect eyebrow shape. Here is the most common method:
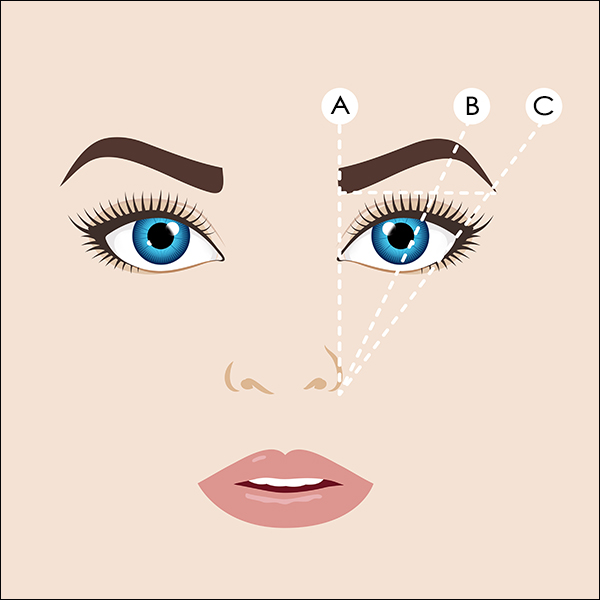
A – Where your eyebrow starts
Hold an eyebrow pencil upright along your nasal wings, pointing upwards toward your brows. Use the White Stick to mark the inner point where the stick meets the eyebrow. This dual-use primer doubles as a precise mapping tool.
B – The arch, or highest point
Hold the pencil diagonally from your nose wing along the outer edge of your pupil. Where it crosses your brow is your ideal arch. Mark this too with the White Stick.
C – Where your eyebrow should end
Angle the pencil from your nasal wing toward the outer corner of your eye. Any hairs beyond this line can be plucked.
4 – CHOOSE THE RIGHT TWEEZERS
Always use a sharp, clean pair of tweezers that grip fine hairs easily. Here's a quick overview of the types:
Point Tweezers – Two very fine tips, ideal for plucking very short brow hairs and ingrown hairs.
Angled (Slant Tip) Tweezers – Flat, slanted tips, perfect for longer eyebrow hairs.
How to hold your tweezers: Hold them like a pen, with the open end pointing upward. Press them a few times before you start to get a feel for the grip and movement.
5 – PLUCKING
Hold the tweezers close to where the hair grows from the skin and always pluck in the direction of hair growth. This prevents breakage and ingrown hairs.
The right order:
- Start with the hairs between your brows.
- Define the arch by removing a few hairs around the highest point.
- Pluck hairs beyond the end line of your brow.
- Finally, pluck hairs underneath to shape the thickness you want.
Watch out!
⚠ The top of your brow usually follows your natural brow line. Be careful not to over-pluck the upper edge.
⚠ Don't over-pluck overall. Eyebrows take several weeks to grow back, and some hairs may not return at all.
⚠ Take your time. Step away from the mirror occasionally to check your progress — and stop when it looks good.
6 – CHECK YOUR EYEBROWS
Use an angled brow brush with spooly end to comb the hairs upward to spot any longer hairs. Trim those with cosmetic scissors, then comb downward and repeat.
Over-plucked eyebrows? Here are three solutions:
Solution 1 – Fill with eyebrow powder
Rather than relying on a pencil, try using a professional eyebrow powder applied with an angled brow brush for a soft, natural result. Available in blonde, brown and black shades. All Marie-José eyebrow powders are water resistant and can be made fully waterproof by using the White Stick as a primer underneath.
Solution 2 – Duo Brow Powder Kits
If you want the ultimate convenience, our Duo Brow Powder Kits include two complementary shades and stencils so you can shape and fill in one step — perfect for recreating brows where hairs are sparse.
Solution 3 – Stimulate new growth with a serum
For longer-term recovery, we highly recommend our Multi Peptide Lash Serum, which is also effective on eyebrows. Applied daily, it helps brows become fuller and thicker within 6 to 8 weeks. Ideal when your brows have thinned out over time.
7 – THE FINAL TOUCH
Some brow hairs simply refuse to stay in place. Instead of plucking them, tame them with our Professional Clear Brow Gel. It was developed specifically for eyebrows and keeps even the most rebellious hairs in place — completely invisible, with a natural finish.
Want a hint of color too? Try our Tinted Brow Gel, available in four shades to add definition and hold in one step.
Ask a Beautician
Still not sure you want to pluck at home? Visit a beautician to get your brows into shape. Once you have a shape you love, maintaining it yourself is easy — just pluck a few hairs here and there to keep things tidy.
Shop all the essentials from this tutorial in our Eyebrow Makeup collection →