How to Apply Henna Brows at Home — Step-by-Step Tutorial
Share
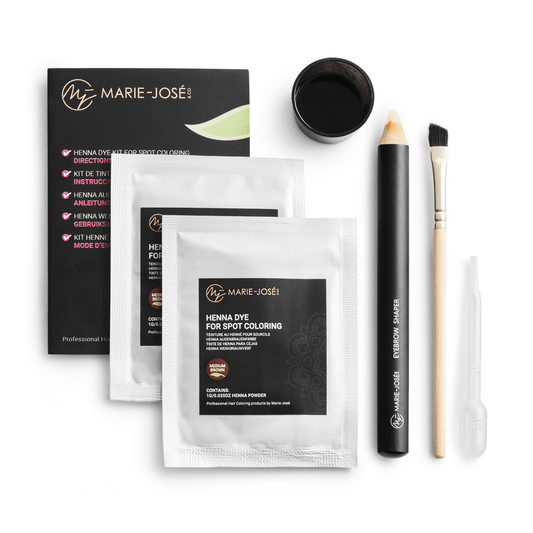
What's in the kit?
- 2 sachets of henna powder — enough for up to 20 applications with careful use
- 1 angled brush — for precise, clean lines
- 1 mixing dish — to mix the powder with water
- 1 pipette — for accurate water dosing
- 1 wax pencil — to outline the brow shape and protect the skin
All you need besides the kit is water.
Which shade is right for you?
The kit is available in three shades:
- Light Brown — for a natural, subtle look. Leave the henna on a little longer for a deeper result.
- Medium Brown — the most versatile shade. Not sure which to choose? This one. You can also mix shades for a personalised effect.
- Dark Brown — our most popular shade. Perfect for defined, full brows.
Step 1 — Do a patch test
The henna contains colour pigments (including PPD) that can cause an allergic reaction in some people. A patch test is required — always do it 48 hours before the treatment.
Mix a small amount of henna powder with water, apply it to the inside of your arm and leave it on for 48 hours. Do not touch or wash the area. If redness, itching or irritation occurs, do not use the product.
Step 2 — Mix the henna
Place a small amount of henna powder in the mixing dish. Add a few drops of water with the pipette and stir until you have a smooth, thick paste. Leave the mixture to rest for 3 to 5 minutes so the powder fully dissolves.
Small lumps in the paste are normal — they activate the henna during processing. What you want to avoid is a paste that is too thin: this can result in a yellow or green tint.
Step 3 — Cleanse the brows
Thoroughly cleanse your brows with an oil-free makeup remover — even if you're not wearing makeup. For better colour adhesion, follow up with a gentle eyebrow scrub to remove dead skin cells — massage in for 1 to 2 minutes and remove with a damp cotton pad. Finish by wiping over the brows with a cotton pad soaked in regular alcohol to fully degrease the skin. Henna adheres less well to oily skin, so this step plays a big role in how long the colour lasts.
Step 4 — Outline and protect the skin
Use the included wax pencil to draw your desired brow shape and protect the surrounding skin. Apply the wax to the skin you do not want to tint — this prevents stains outside the brow shape. You can also use petroleum jelly with a cotton swab for the same effect.
Step 5 — Apply the henna
Apply the paste using the included brush. Start at the tail of the brow and work towards the front. Press and stamp the paste firmly into the skin — make sure the entire brow and the skin beneath it are covered with a thick, even layer.
First time?
Leave the henna on for a maximum of 10 to 15 minutes the first time. This shows you how your skin reacts before you build up the processing time. More experienced? You can work up to 20–30 minutes for a deeper result.
Want an ombré effect? Remove the henna at the inner head of the brow after 5 minutes — leave the rest on longer. The longer the processing time, the darker the result.
Step 6 — Remove the henna
Wipe away the paste with a dry cotton pad. Then go over once more with a damp cotton pad for any remaining residue. Use a cotton swab for the edges.
Any stains outside the brow shape? Correct them as quickly as possible — henna adheres more firmly the longer it sits. A small amount of alcohol gel on a cotton swab works well on fresh stains.
Step 7 — Aftercare
Keep your brows dry for the first 12 hours. Avoid showering, swimming or visiting a sauna. Also avoid oil-based products and scrubs on the brow area — these accelerate fading of the colour on the skin.
The colour lasts up to 6 weeks on the hairs and on average 1 week visibly on the skin. After a week you can top up the skin colour daily with an eyebrow pencil or powder.
Want even better results?
The kit works great on its own, but a few small additions make a noticeable difference:
- Eyebrow scrub before the treatment (see step 3) removes dead skin cells so the colour adheres better and lasts longer on the skin. Massage in for 1 to 2 minutes before step 3.
- Rose water instead of plain water gives a richer colour deposit and is gentler on the skin. Use the dropper for accurate dosing.
- Eyebrow powder or eyebrow gel after 1 to 2 weeks to maintain the skin colour between treatments.
Frequently asked questions
How many applications do I get from the 2 sachets?
With careful use you can get at least 3 to 5 applications from 1 sachet — so the 2 sachets together are good for up to 20 uses. Seal an opened sachet tightly (e.g. with tape) and store in a cool, dark place. Use within 2 weeks of opening.
My result is very light — what am I doing wrong?
It's usually down to processing time or layer thickness. Try applying the paste a little thicker next time and build the processing time up to 20–30 minutes. Also make sure the brows are well degreased before applying.
The henna has turned yellow or green — what went wrong?
This happens when the paste is too thin or the powder hasn't fully dissolved. Next time, let the paste rest for 3 to 5 minutes after mixing and aim for a thicker consistency. Small lumps in the paste are normal and don't need to dissolve.
Where can I find more training material on Henna Brows?
Visit our Henna Brow Academy blog for professional tips and training.
Ready to get started?
The Henna Eyebrow Tint Kit — including all tools — is available in three shades.
Shop the kit